Showing posts with label Sweets. Show all posts

Fried Banana with Sesame Seeds and Grated Coconut

- 6 comments
How about enjoying something completely different varieties of sweet dish other than regular Diwali sweets.  It is completely healthy, stomach filling sweet dish that can simply liven up your taste buds. Today I am delighted to share Fried Banana recipe in Plantain. 

Making Fried banana takes only three steps 1) make batter to dip 2) simply peel and slice the banana into horizontal pieces 3) dip and deep fry. Let them cool for several minutes before serving, it will turn extremely crispy you can literally hear the sound of it. I bet it will be favorite snack for your family members of all ages and perfect party food.


Ingredients:

Plantain |Banana  – 1no.
Oil for frying

For Batter 

Rice Flour – ½ cup
Sugar – ¼ cup
Baking Powder – ½ tsp
Salt – 1 tsp
Grated Coconut – 3 tbsp
Toasted Sesame seeds – 2tbsp
1/3 cup water


Method:

Step 01) Take mixing bowl, add rice flour, sugar, salt, baking powder, grated coconut, toasted sesame seeds mix well with spoon and add water and stir until nicely combined batter. Consistency should be medium not too much watery or solid.


Step 02) Chop the top and bottom portion of banana. Peel and slice into 4 pieces and cut them horizontally into 3 pieces


Step 03) Heat a pan with oil. Dip the banana pieces into the batter and fry for about 4 minutes or until they turn to golden color. Transfer fried banana to paper towel to drain the excess oil.


Serving Tip:  
Let the fried banana cool for several minutes before serving, this enhances more crispiness. 


Did you find this post useful? Feel free to share your feedback in the comments area.

If you are interested to be notified for the new posts from us, then you can make use of the subscribe option available on the right side menu.

Help us to improve our search rating by recommending this post to Google using the Google plus button below.
[Continue reading...]

Badusha | Balushahi - Diwali Sweet Recipe

- 2 comments
In southern part of India call as Badusha and northern part call as Balushahi - This sweet dish is so soft and flaky in texture and melts in your mouth. Its must have sweet dish during festival like Diwali. This recipe requires simple ingredients which are always available in our kitchen and you can able to prepare this dish very easily. Small balls are prepared from all purpose flour which are deep fried and dipped in sugar syrup to give it a sweet flavor.

Badusha | Balushahi Recipe

This Badusha always reminds my childhood days. Usually in our city, light cuts off at 6 to 8 pm every 3 days and my father brings this sweet dish for us. We enjoyed the light cuts because of this sweet dish. Is it funny! Those were care free days and guilt freely we were gulping this wonderful sweet!

Ingredients:

For Dough:
All Purpose Flour / Maida – ½ cup
Baking  Powder – ¼ tsp
Baking Soda – a Pinch
Butter – 2 tbsp
Yogurt/Curd – 2 tbsp
Salt - a pinch (optional)
Oil for deep frying

Sugar Syrup:
Sugar – ½ cup
Water – ¼ cup
Lemon Juice – 2 tsp

Garnishing:
Chopped Almonds - 5 to 6nos
Chopped Pistachios – 6 to 7 nos.

Method:

Step 01) Take a bowl add all purpose flour, baking soda and baking powder sieve together to mix it well. Add butter and crumble it.

Badusha | Balushahi Recipe Step 01

Step 02) Add curd and mix it lightly. Do not knead like a dough at this step (because at this step we don’t want to make gluten to form) Dough should look like flaky see the picture below. Cover the dough with lid and let the dough rest for 10 to 15 minutes.

Badusha | Balushahi Recipe Step 02

Step 03) In low flame heat a pan add sugar little bit of water cook it till you get one string consistency syrup. Add little bit of lemon juice. Lemon juice helps the sugar syrup to avoid crystallization. Switch off the flame

Badusha | Balushahi Recipe Step 03

Step 04) Take the flaky dough and knead it once again as smooth dough (Do not mix it too much, just all the dry flour is to be evenly mixed. Take the dough in to small size give a shape like ball and flat little bit and in the center make a dent from your thump ( ball should have rough edges when you fry and put it in sugar syrup, the syrup will go into all the small holes) So make sure balls should not have smooth edges

Badusha | Balushahi Recipe Step 04

Step 05) Heat oil and fry them in medium heat till you get the golden color patches appear on both sides. Add them to sugar syrup. Let them to sit in the sugar syrup for couple of minutes and then put it in a serving plate and garnish with chopped almonds and pistachios.

Badusha | Balushahi Recipe Step 05

Note:
Baking soda and baking powder helps to aerate the dough
No need to add extra water to dough, as Butter and curd itself gives enough moisture for dough
Lemon juice helps the sugar syrup to stay as sugar syrup. It will not solidify when cools down.
Badusha | Balushahi Recipe

Did you find this post useful? Feel free to share your feedback in the comments area.

If you are interested to be notified for the new posts from us, then you can make use of the subscribe option available on the right side menu.

Help us to improve our search rating by recommending this post to Google using the Google plus button below.
[Continue reading...]

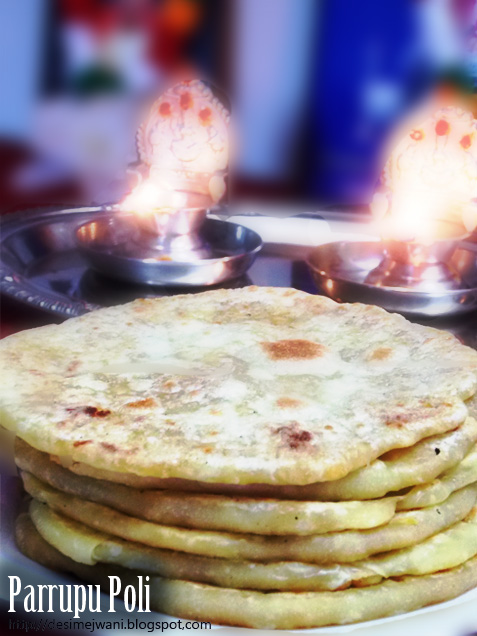
Paruppu Poli | Puran Poli for Navratri

- 4 comments
One can prepare this sweet dish in chana dal (kadalai Paruppu), or tuvar dal (tuvaram paruppu). Or even equal proportions of both the dals. This time I prepared with Tuvaram Paruppu. This recipe doesn’t require any exotic ingredients and very easy to prepare.

Parruppu Poli Recipe

Last weekend when we are watching Tamil movie, there was a scene in that everyone was enjoying the delicious poli and my husband immediately looked at me with a big smile on his face asked “ Can we have?” it’s been a long time, I have not prepared this wonderful dish and Navratri is also approaching and I have not shared poli recipe on my space, so I just thought to do it immediately.  He helped me in the kitchen to flip the poli and we enjoyed the hot poli very much smearing ghee on top. I must tell you, it tastes too good when you add extra ghee on top :)

Puran/Pooran Poli Recipe

In Kannada they call it as Holige or Obbattu,  in Maharashtra as Puran Poli, and In Tamil as Parrupu Poli. To make it more healthier sweet dish, you can use wheat flour instead of all purpose flour.

Holiga or Obbattu Recipe

Ingredients to make Poornam:
Tuvar Dal/Tuvaram Paruppu/ Yellow Lentil  – ½ cup
Powdered Jaggary - ½ cup
Elaichi / Cardamom Powder – 1 tsp
Water – 1cup

Ingredients To make outer shell:

All Purpose Flour / Maida – 1 cup
Turmeric Powder – ¼ tsp
Salt – ½ cup
Clarified Butter – 2 tbsp

Water – ½ cup

Method:

Step 01) Wash tuvar dal and soak it in water for 1 hr. And then cook the dal nicely in pressure cooker or stove top pan.

Puran Poli recipe Step 01

Step 02) Drain the water completely and allow the dal to cool down and then blend it in mixer with cardamom powder and jaggary and transfer this paste into bowl. Refrigerate the pooram for 1/2 hr, when it is nicely cool down you can size them into balls or scoop it with spoon as pooram stuffing

Puran Poli recipe Step 02

Step 03) In a bowl add maida, turmeric powder and salt mix well. Add water little by little and knead the dough.  Smear 2 to 3 tsp of oil knead as smooth as possible like elastic dough and covered it with lid. Let the dough rest for ½ to 1 hr this helps the dough more smooth and pliable

Puran Poli recipe Step 03

Step 04) In any flat surface (I inverted a steel plate) Grease the plastic sheet with generous amount of oil and then place the ball of dough and pat on greased surface and place the pooram in center

Puran Poli recipe Step 04

Step 05) Pull and fold the pooram evenly with the patted dough cover and seal as per below picture and start patting  the stuffed dough into poli shape

Puran Poli recipe Step 05

Step 06) Heat tawa add teaspoon of ghee and gently place the flattened poli on it, and cook them on low flame and flip when raw appearance of dough disappear and cook till you get the golden color patches appear on both sides.

Puran Poli recipe Step 06


Note: 
  1. Good option is banana leaf; this leaf helps poli to flip it on tawa more easily and not burning your finger
  2. If you are using plastic sheet then, it is better to transfer to your hand and then place it on tawa, that way you can avoid the burning of plastic sheet and your hand.
  3. If you are pro, keep it in very low flame and pat stuffed poornam dough directly on tawa.
  4. You can also use grated coconut to the pooram stuffing but, shelf time will be lesser.


Did you find this post useful? Feel free to share your feedback in the comments area.

If you are interested to be notified for the new posts from us, then you can make use of the subscribe option available on the right side menu.

Help us to improve our search rating by recommending this post to Google using the Google plus button below.
[Continue reading...]

Sabudana Kheer / Javvarisi Payasam / Tapioca Pudding

- 2 comments
Javvarisi Payasam / Sabudana Kheer is another winner in desert! This is so easy to prepare and one of our favorite! This is light and creamy kheer and delicious. Instead of fat milk you also use half and half it tastes good too. This kheer requires very few ingredients and little bit of stirring.  Treat for any festival.

Sabudana Kheer Recipe

 Javvarisi payasam is ultimate comfort food. Whenever I'm sick, or fasting day, or its cold outside, or anytime feeling to have some sweet dish, I go to make this. This time, as Navratri festival is coming and so cold outside thought to share in my space one easy sweet recipe.
  
Javvarisi Payasam Recipe


Sabudana Kheer recipe - Ingredients:


Sabudana/Sago/Javvarisi/ Tapioca – 1/2 cup
Milk – 3 cup
Sugar  - ¾ cup
Cardamom Powder – 1 tsp
Cashews - few
Raisins - few
Clarified Butter / Ghee – 1tbsp
Water  - 1 cup (appox)

Method:
  
Javvarisi Payasam Recipe Step 01Wash the sabudana twice and add water,


Javvarisi Payasam Recipe Step 02the water level should be just the half inch above the sabudana pearls to get soak. More water ruins the pearls and it becomes sticky in texture. Pearls will appear swelled up after 1 to 2 hrs of soaking. From your fingers loosen up nicely as separate pearls.


Javvarisi Payasam Recipe Step 03
In medium pan heat 1 tbsp of ghee and roast the cashews and raisins and transfer into a plate


Javvarisi Payasam Recipe Step 04In the same pan add milk and soaked sabudana pearls and cook them until milk bubbles form at edges. 


Javvarisi Payasam Recipe Step 05
Add sugar mix well and cook till sugar completely dissolves. Keep it low flame and then add cardamom powder.


Javvarisi Payasam Recipe Step 06
Cook and stir until mixture thickens enough to coat the spoon, switch off the flame.


Serve it hot, warm or cold as per your family preference. While serving add some more milk on top and garnish with roasted cashews and raisins.

Sago Kheer Recipe


Note: If you are using nylon sabudan, then instead of soaking roast them nicely and then cook them in boiling water till the pearls are nice and tender and discard the water.

Did you find this post useful? Feel free to share your feedback in the comments area.

If you are interested to be notified for the new posts from us, then you can make use of the subscribe option available on the right side menu.

Help us to improve our search rating by recommending this post to Google using the Google plus button below.
[Continue reading...]

Peanut Ladoo / Groundnut Laddu

- 6 comments
This is one of simple, delightful and healthier version of sweet you can have any time without any guilt feelings. It is very easy to prepare and requires few ingredients and it always available in our pantry. Whenever I bought the peanuts, I always make sure to dry roast them and store it in a air tight container and use it whenever the recipe calls for. This time I completely forgot to use the peanuts for about two weeks and it was sitting whole container. As peanut and jaggary both are having potential health benefits. This is the awesome and simplest recipe to make use of them. It perfectly serves as emergency snack or mid morning hunger pangs :)
Peanut Ladoo


and this Peanut ladoo is also one of signature Diwali sweets.

Groundnut Laddu


Ingredients:
Peanut/Ground Nut – 1 cup
Jaggary / Brown Sugar – ½ cup

Optional Ingredients:
Salt – a pinch
Cardamom powder – ½ tsp
Cashew nuts few 

Method:

Step 01) Heat a pan and roast the groundnut nicely till they get light brown. You will get nice nutty flavor from peanuts and you will notice shiny oily skin of peanut that is the time you will turn off the gas. And allow them to cool.

Step 02) Blend the roasted peanut in a food processor and blitz until roughly chopped and then add the chopped jaggary and blend it again until the mixture starts to come together.  Repeat the same for the remainder of peanut and jaggary.

Step 03) Transfer this mixture to a big plate add a pinch of salt, cardamom powder, chopped cashews and mix it nicely and evenly.  Salt, Cardamom powder and cashew nuts are just to enhance the taste, fragrance and crunchiness to the laddo.  You can skip them totally, still the laddo tastes wonderful.  These are for value addition.

Step 04) Take a handful of blended mixture and gently press it together to form a shape of ball.  start to roll them as per your preferred size like big, medium or small.

Step 05) As the roasted peanut leaves the oil, there is no need of extra oil to roll them, if you still thought to make them richer, you can add little ghee/clarified butter while giving shape as ball/ladoos. 

Store it in a air tight container and enjoy the laddu.  

peanut Laddu

Note:
If you are looking laddos color to be white then, remove the skin of peanut before blending

You can use the powdered brown sugar instead of jaggary

For smooth texture of laddu blend the peanut as smooth powder instead of coarse powder

Did you find this post useful? Feel free to share your feedback in the comments area.

If you are interested to be notified for the new posts from us, then you can make use of the subscribe option available on the right side menu.

Help us to improve our search rating by recommending this post to Google using the Google plus button below.
[Continue reading...]

Rava Kesari | Semolina Pudding | Indian Dessert

- 2 comments
This is one of the easy, quick and simplest Indian dessert made with rava or sooji i.e. semolina. In southern part of India, it is called as Kesari and in northern part of India called as Sheera or Sooji ka Halwa. This Rava Kesari is irresistible when it’s homemade; there are no artificial flavors and colors used in this recipe. To learn this amazing drooling and delightful sweet dish check out our step by step photo recipe.

Rava Kesari

In south Indian languages the color orange called as "Kesari" and this dish mostly looks like orange tone due to food coloring. I hope, that is the reason kesari name stuck to this dish!. 

As I remember, this sweet dish is a must in special occasions like, the very first function in the wedding i.e. after the horoscopes matches, the bride groom visit the bride house, and the girl family serves this wonderful remarkable sweet dish to the guests. In Tamil this function called as “Ponnu Pakkura Function”. 

Here is the recipe!!

Ingredients:

Semolina/ Rava – 1 cup
Sugar – 1 ¼ cups
Water – 1 ½ cups
Milk – ½ cups
Condensed Milk – ¼ cup (Optional)
Almond/ Badam – 1 tbsp
Cashews Nuts / Kaju – 1 tbsp
Raisins/ Kismis – 1 tbsp
Salt – a Pinch
Clarified Butter/ Ghee – 2 tbsp

Method:

Put a heavy bottom pan on the range and heat clarified butter. Fry the cashews, almond and raisins.


once they are start turning slight dark color; add the rava/semolina and roast them nicely till you get nice aroma or till rava turns to faint pink color. Stir it continuously or else rava stick to the bottom of the pan very quickly and it will burn.


Add the sugar and mix it nicely


Add the water, milk, pinch of salt and stir continuously and cook the rava mixture. This will take 3 to 4 minutes. 


Reduce the flame to medium and stir the mixture slowly. Add 1 tbsp of clarified butter and mix it nicely. This improves taste and also helps to leave the mixture from the pan fast.

When the mixture starts to leave and not sticking to sides of the pan means it is done. Switch off the gas.


Notes:

If you are using condensed milk then reduce the quantity of sugar
Water is very much necessary otherwise the kesari will be hardens on cooing  
If you like to give color to the kesari, then add the food color in 4th step


Rava Kesari


Did you find this post useful? Feel free to share your feedback in the comments area.

If you are interested to be notified for the new posts from us, then you can make use of the subscribe option available on the right side menu.

Help us to improve our search rating by recommending this post to Google using the Google plus button below.
[Continue reading...]
Related Posts Plugin for WordPress, Blogger...
 
Copyright © . Desi Mejwani - Posts · Comments
Theme Template Powered by Blogger